Dashboard

[et_pb_section fb_built="1" _builder_version="3.22"][et_pb_row _builder_version="3.25" background_size="initial" background_position="top_left" background_repeat="repeat"][et_pb_column type="4_4" _builder_version="3.25" custom_padding="|||" custom_padding__hover="|||"][et_pb_text _builder_version="4.6.5" background_size="initial" background_position="top_left" background_repeat="repeat" hover_enabled="0" sticky_enabled="0"]
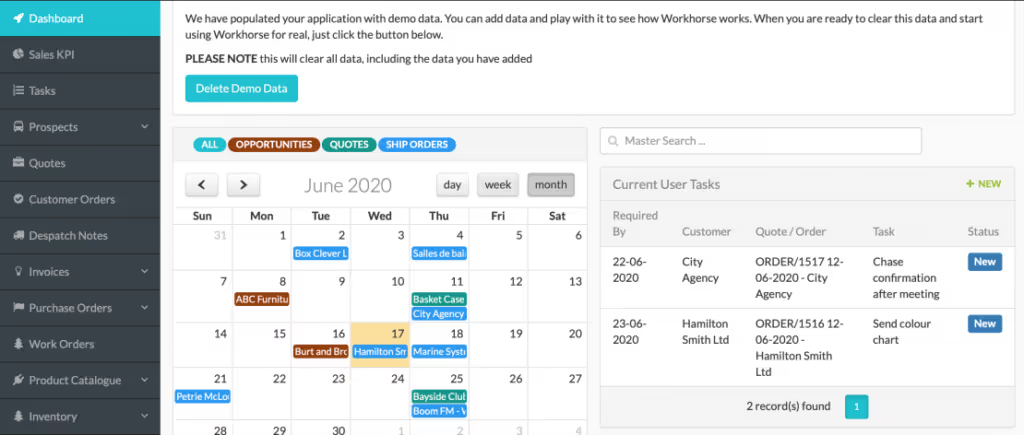
The Dashboard is the first module which displays when you access the application.
[caption width="1024" id="attachment_1199" align="alignnone"]

Fig 16 Dashboard[/caption]
You can see that the Dashboard module is highlighted in blue in the module list on the left-hand side of the screen. You can navigate to other modules, by clicking the name of the module you wish to go to from this left-hand side menu.
The Dashboard module is divided into 3 sections: Welcome to Workhorse, the Calendar and Current User Tasks.
There is also a Master Search button on the top right. This allows you to search the whole system. For example if you enter a client name, all records pertaining to that client will display.
Welcome to Workhorse
The Welcome to Workhorse area will show current system messages. When you first enter this Micro version of Workhorse, you will see a message showing you how to clear the demo data. You’ll probably want to use the demo data for a short while and add to it, just to see how Workhorse works. Be aware that any data you add will also be deleted when you delete the demo data. Once you’ve deleted the demo data you can start entering your own data and use the system for real!
The Welcome to Workhorse area will show any other system messages that you might need to know about. For example, alerts about new functionality.
Calendar
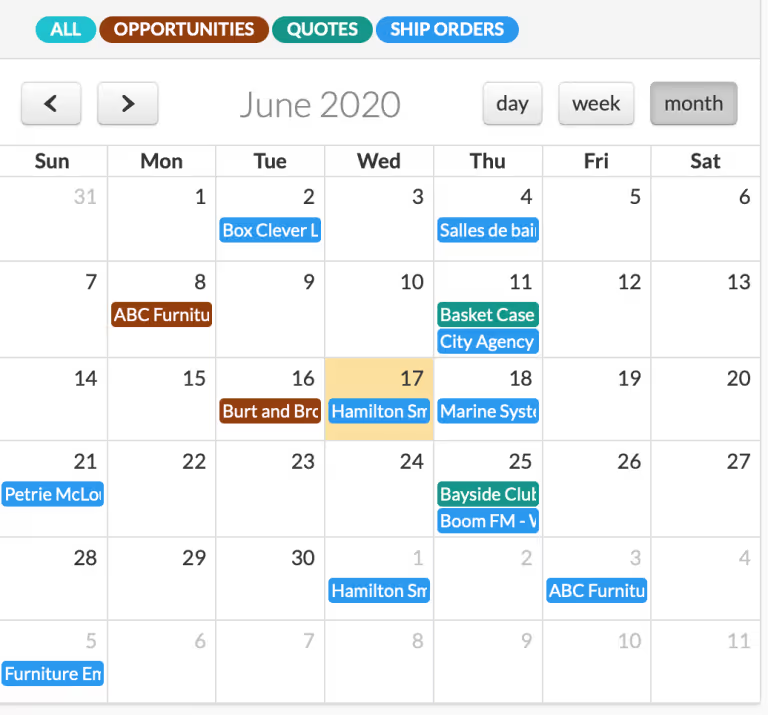
The calendar allows you to see any Order Installation/Delivery Dates that are due within a specific timeframe. There are three Time views: Day, Week and Month and you can change by clicking the button above the top right-hand corner of the Calendar. The left and right arrows above the top left-hand corner of the Calendar allow you to move to the next available timeframe which is available based on the view you have picked. For example, if you are in Month view and you are in April, the left arrow will take you to March and the right one to May.
You can select for the calendar to display everything (All), Opportunities, Quote Follow Ups, Ship Orders (order shipping dates). In the calendar, you can click on any lozenge to see the details of that item.
[caption width="768" id="attachment_1201" align="alignnone"]

Fig 17 Calendar in Month Mode[/caption]
Opportunities show on the Opportunity follow up date.
Quote Follow Ups will display in the calendar if the Follow Up date is selected in Additional Information in Quotes.
Ship Orders display on the Ship Date, selected in the main pane in Customer Orders.
In the Pro version of Workhorse it is possible for the Calendar to display other items.
Current User Tasks
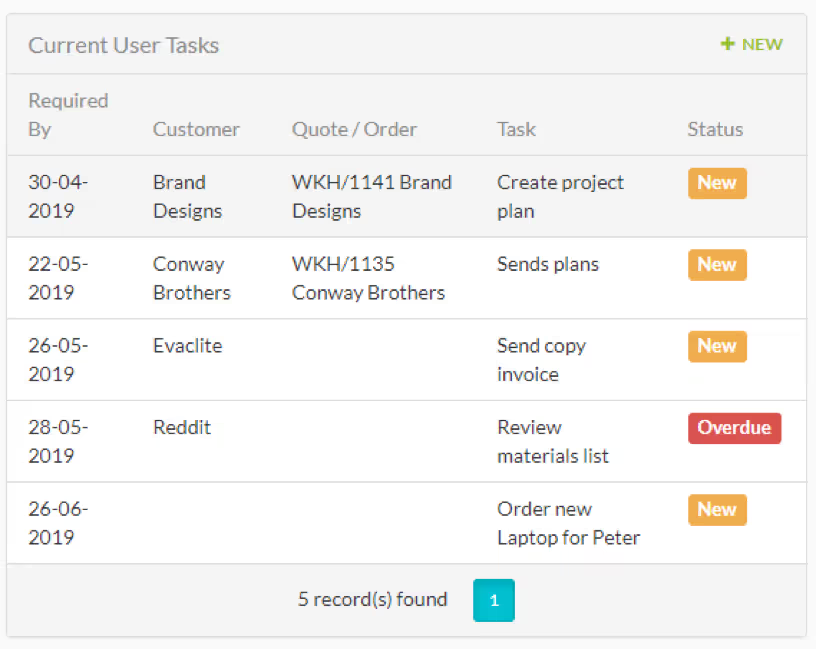
Listed under this section, will be all the Tasks that are allocated to you. When you first open the system there will be no tasks allocated to you. You can add tasks from here, the Dashboard or from the Quotes, Customer Orders and Customers Modules.
You are the only user in the Micro version of Workhorse so, the list displayed here will be the same as the list displayed in Active Tasks. Completed Tasks won’t display in this view, to see them go to the Tasks section and search for completed tasks in the advanced search section.
[caption width="816" id="attachment_1203" align="alignnone"]

Fig 18 Current User Tasks[/caption][/et_pb_text][/et_pb_column][/et_pb_row][/et_pb_section]
Ready to Transform
Your Customer Management?
Get started today and see the difference Workhorse can make for your business.


.svg)

