The product catalogue consists of 5 sections:
• Products – This is the area where you add all your products and the constituent products for Kits and Assemblies.
• Kits – Kits are groups of products which can be sent out together – for example, food hampers or furniture kits.
• Assemblies – Assemblies are groups of products which are assemble on site before being sent out. They require a Work Order for the work required to put them together – see the Work Order section.
• Price Lists -This section allows you to set up different price lists for clients, which could be for example in different currencies or for different client types.
• Stock Transfer – This allows you to move stock from one stock location to another.
Products
All information on the products that your company sells can be viewed in this module.
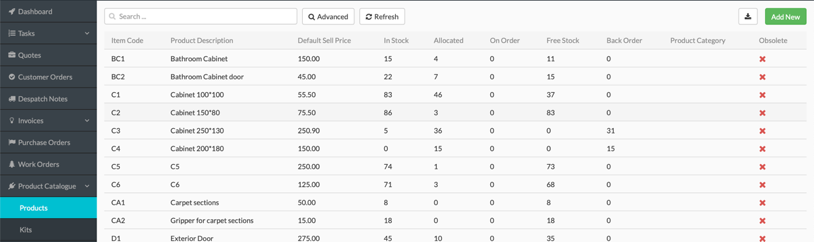
Fig 22. Product – Display
New products can be created by clicking the Add New button in the top right-hand corner of the screen.
Fig 23 Enter Product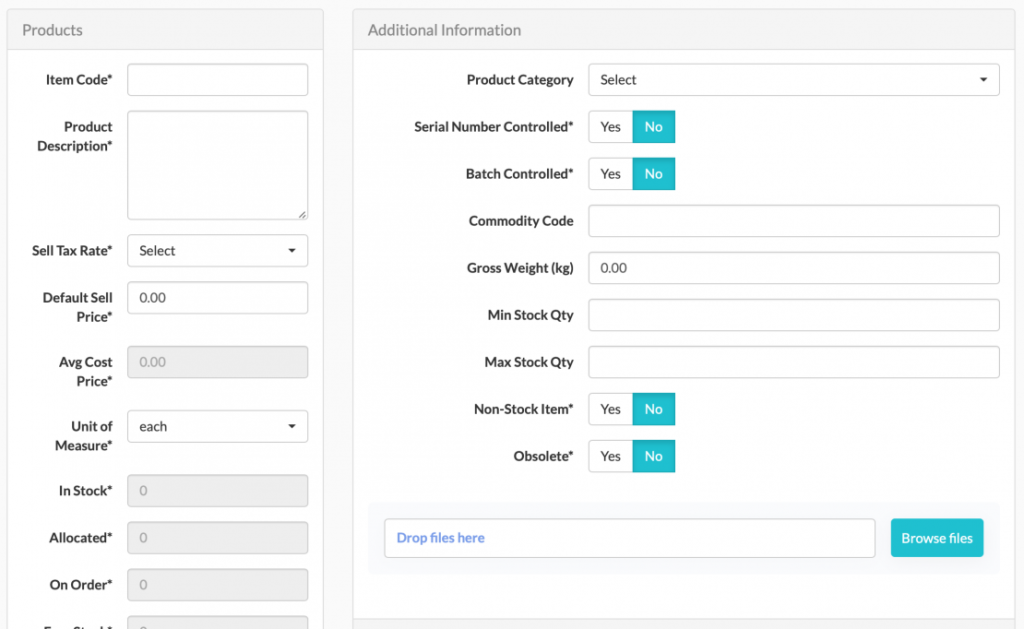
Enter all details of the product and select Save. Once you’ve saved the basic details of the product in the left-hand pane and in the Additional Information section, you can add further details in the Product Suppliers, Stock Adjustment, Product Locations.This table contains details of what all the Product fields represent.
| Products Section | ||
| Name of Field | Mandatory | Description |
| Item Code | Y | Code to allow you to identify each product uniquely |
| Product Description | Y | Description of product. This will display in the printable documents like Quotes. |
| Sell Tax Rate | Y | Picked from a dropdown. Select the tax rate which will apply to this product. |
| Default Sell Price | Y | The price of the product to the customer if no other prices or discounts to be applied (see Prices and Discounts) |
| Average Cost Price | Default | This is the average of the prices this product has been bought at. See section “How is the average cost price calculated?” |
| Unit of Measure | Y | The units of measure that the product is sold in e.g. each, kg, litres etc. This defaults to “each” |
| In stock | Default | The number of this item currently in stock |
| Allocated | Default | Number of items allocated to orders |
| On order | Default | Order has been sent to supplier but not received in stock yet. |
| Free stock | Default | Stock available which is not already allocated to an order |
| Back order | Default | When a Customer Order is raised and there isn’t enough stock, the items will go on back order so they can be purchased. |
| Xero ref | Default | Reference number for this stock item in Xero |
Products – Product Suppliers
Product Suppliers shows all the suppliers who supply this product. You must add at least one supplier in order to raise a Purchase Order on a product, though you can add products to stock via a Stock Adjustment (see below), without there being a Supplier in place.

Fig 25. Product Suppliers – Display
To add a new Supplier, click + New in the bottom right-hand corner of the screen.
Fig 26 – Product Suppliers Add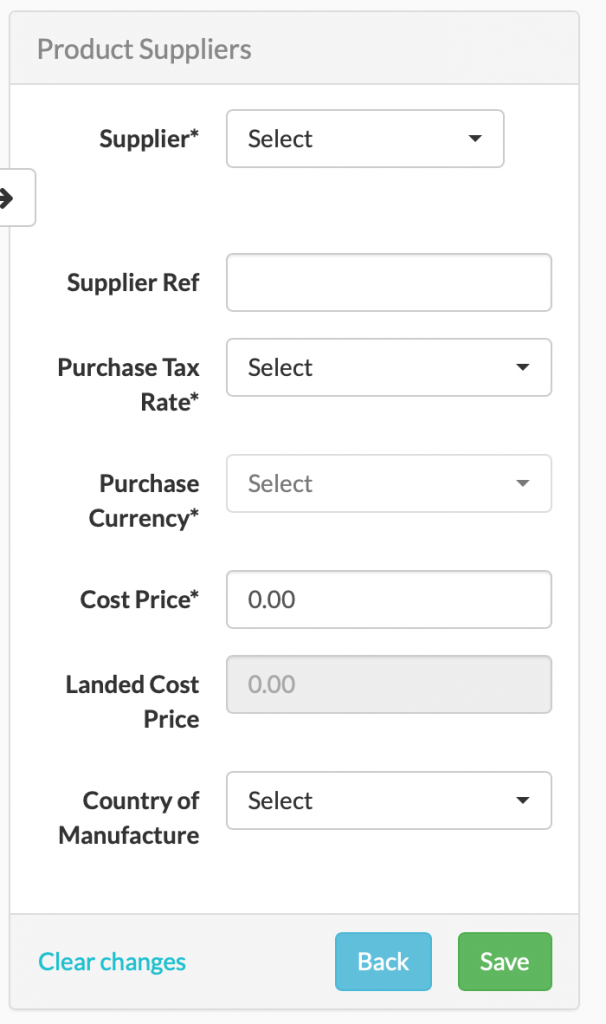
This table contains information of what each field represents.
| Product Suppliers | ||
| Name of Field | Mandatory | Description |
| Supplier | Y | Pick which suppliers supply this product |
| Supplier Ref | N | The suppliers reference code for this product |
| Purchase tax rate | Y | The tax rate which applies |
| Purchase Currency | Default | The currency in which you purchase the product. This defaults based upon the Supplier you choose and the currency they use. |
| Cost Price | Y | Enter the cost of the product to you in the currency in which it is sold |
| Landed Cost Price | Default | The cost of the product in your operating currency. If you bought the item in your operating currency, then the Cost Price and Landed Cost Price will be the same figure. |
| Country of Manufacture | N | Where the item was made |
Products – Stock Adjustments
The stock adjustment section is used for entering stock without a Purchase Order – for example when you first start using Workhorse you’ll probably already be holding stock that you need to enter into the system or, when you do a stock check you find you have more or less stock than you expected and need your system to record the difference.

Fig 27. Stock Adjustment – Display
To add a stock adjustment, select + New
Fig 28. Stock Adjustment – Add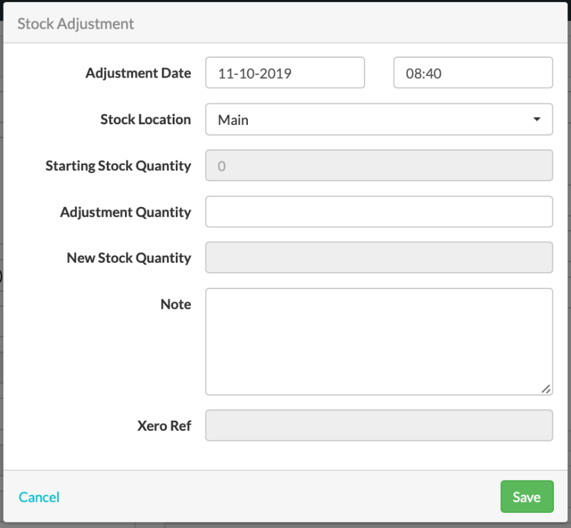
| Stock Adjustment | ||
| Name of Field | Mandatory | Description |
| Adjustment Date | Y | Defaults to today’s date though this can be changed |
| Time | Y | Defaults to the current time though this can be changed |
| Stock location | Y | Where are you holding this stock? If you only have one location it will default here, but if you have multiple you can select the one you need. |
| Starting stock quantity | Default | The amount of stock you are holding at this location before you make the adjustment. |
| Adjustment quantity | Y | The amount of stock you’re adding or removing. If your stock balance is 10 and it should be 8, enter (-2) here. |
| New stock quantity | Default | Starting stock quantity +/- the adjustment |
| Note | Y | Reason for adjustment |
| Xero reference | N | Identifier of this adjustment in Xero |
Once you’ve made the stock adjustment, it will display on the Stock Adjustments area of the Products page.
Fig 29. Stock Adjustment – Display after SA
Products – Product Locations
If you have multiple warehouses, this is where you can see where your stock is located. This section allows you to view stock quantities by location. You cannot add stock to a location here, to add to stock you need to raise a purchase Order or a create a Stock Adjustment.
If you create new Locations in Settings > Locations, they will automatically be displayed in the Stock Location dropdown so that you can allocate new stock to them.
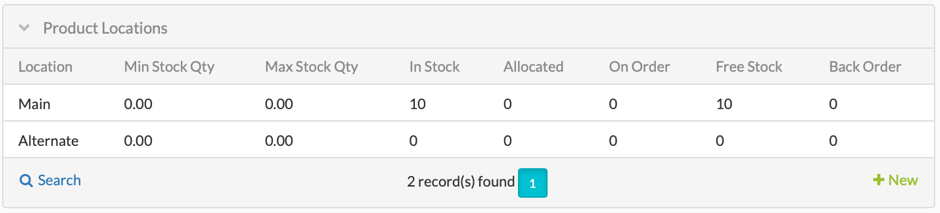
Fig 30. Product Locations – Display
This table describes what the fields in the Product Locations Display above represent.
| Product Locations | ||
| Name of Field | Mandatory | Description |
| Location | Y | Shows all of the locations you have set up in Settings > Lists |
| Min Stock Quantity | N | The minimum stock quantity at this location. |
| Max Stock Quantity | N | The maximum stock quantity at this location. |
| In Stock | Defaults | Shows the number currently in stock. |
| Allocated | Defaults | Shows the number with orders raised against them. |
| On Order | Defaults | Shows how many are on order with suppliers. |
| Free Stock | Defaults | Shows In Stock minus Allocated. |
| Back Order | Defaults | When a Customer Order is raised and there isn’t enough stock, the items will go on back order so they can be purchased. |
Stock Transfers
Stock transfers are useful if you are holding stock in a number of locations and wanting to move it between locations. Some Workhorse clients use multiple stock locations to order their stock – for example shelves in a warehouse, and the stock transfer functionality can be used to move it between locations.
Fig 30a – Stock Transfers
When you enter the locations you want to transfer stock from then the “Available Quantity” field will populate with the number of items available at that location. You then enter the Stock Location that you want to transfer the stock to and the quantity to transfer (which must be less than or equal to the Available Quantity). You must also enter a not to explain why you are transferring the stock. Once you have saved the transfer, you’ll be able to see the stock transfer in the stock transfer summary table. The new stock levels will also show in the Product Locations area for that product in the Products screen.
Kits
The kits functionality allows you to configure groups of products to send out together. This is useful for example for things like food hampers, furniture kits which are despatched without being built. The system can show you whether or not you have the constituent parts in stock and where they are held. NB a kit will show as available when you have all the constituent parts available at one location and not where parts are spread across more than one location.

Fig 31. Kits – Display
In the above example there are three kits set up in the system.
Select + New to add a new kit.
Fig 32. Kit – Entry page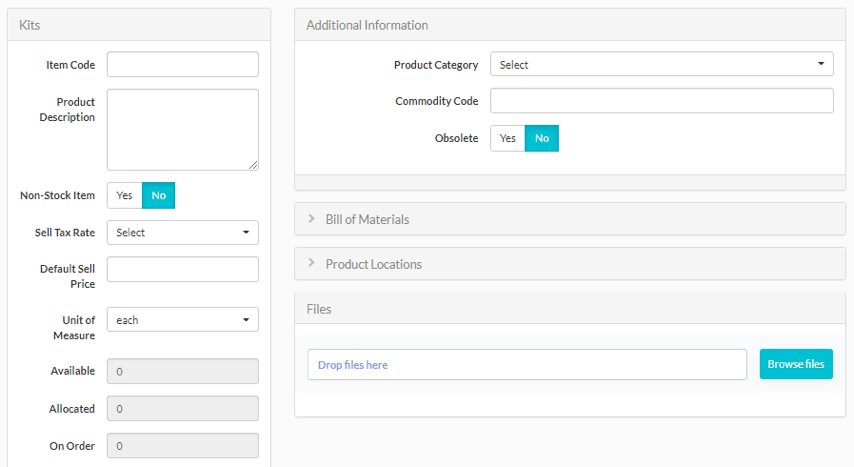
In order to proceed you need to first add the details in the left-hand column and Additional Information.
This table contains details of what each field represents.
| Kits | ||
| Name of Field | Mandatory | Description |
| Item Code | Y | Your item code for this Kit |
| Product Description | Y | Kit Description |
| Non-Stock Item | Default | Defaults to No but you can change this |
| Sell Tax Rate | Y | Select the appropriate tax rate |
| Default Sell Price | Y | The default price for this combination of items |
| Unit of Measure | Default | Defaults in Micro to “each”. It is possible to change this |
| Available | Default | Number of kits that can be made up in the different locations, so if you have enough stock to make 1 kit up in location Main and 3 in Location Alternate, the overall available amount will be 4. |
| Allocated | Default | Number allocated to orders |
| Free Stock | Default | Number available that is not already allocated to an order. |
| Back Order | Default | When a Customer Order is raised and there aren’t enough kits in stock, the items will go on back order so they can be purchased. |
| Xero Ref | Default | Identifier of the kit in Xero |
If this kit is in a product category you can select it in the Additional Information area. You can also enter a commodity code and you can set the kit to Obsolete if you are no longer selling it.
Next you need to add the items which make up this kit. This is done in the Bill of Materials area. Expand the Bills of Material and click + New in the bottom right-hand corner.
Fig 33 Bill of Materials – + New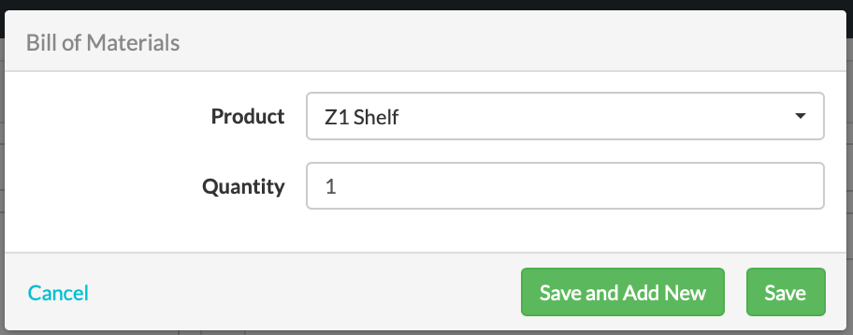
Add each of the constituent products for the kit. Once you’ve added all the items they will display in the Bill of Materials.
Fig 34. Kits – Bill of Materials Display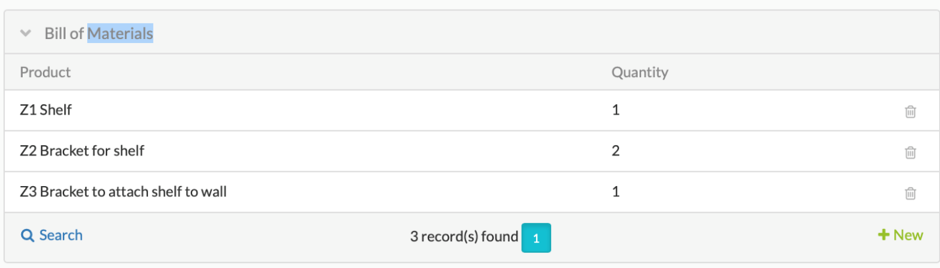
Once you’ve entered all the items needed to make up your kit, you’ll be able to see availability both in the Kits column on the left-hand side of your screen and availability by location in the Product Locations area. See two screenshots below.
Fig 35. Availability in the Kits Section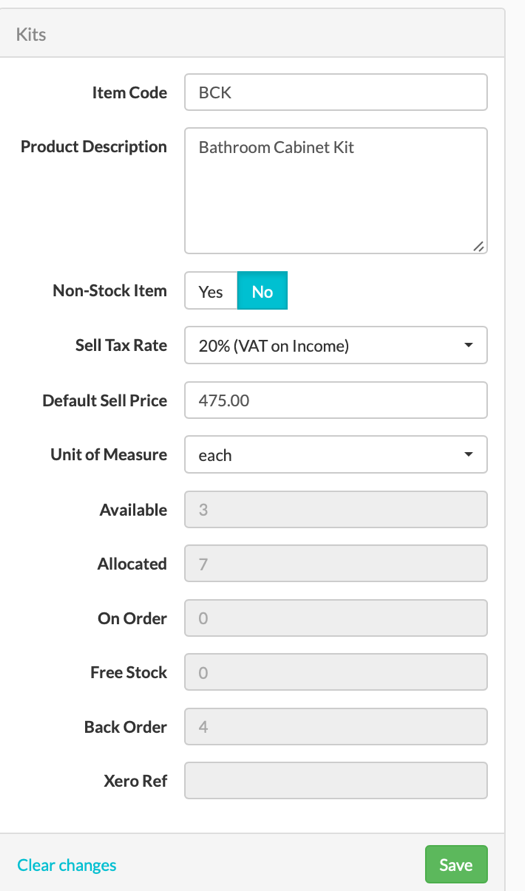
Fig 36. Availability by Product Location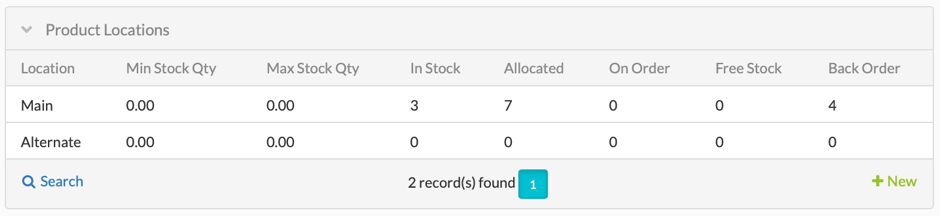
You can see that in this case, all products are held in the Main location. If there were products also held in the Alternate location, then the Kits area would display the sum of both.
If there are any files pertaining to your kit you can drop them in the Files area. These might include Assembly Instructions.
Assemblies
The Assembly functionality allows you to group products to be assembled on site and sent out. An assembly will consist of constituent parts and a work order. This is useful for example for things like furniture constructed at your factory.
This section works very much in the same way as Kits, the only difference being that an Assembly requires a work order in order to create the Assembly and that the work is done at your site so the items are taken out of stock at the point that the work order is raised as that means that the products have been used to produce one assembled product.
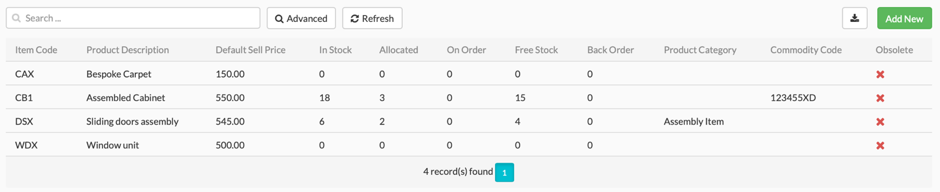
Fig 37. Assemblies Display
When you wish to add a new type of assembly select the Add New button on the top right-hand side of the screen.
Fig 38 Assemblies – Add New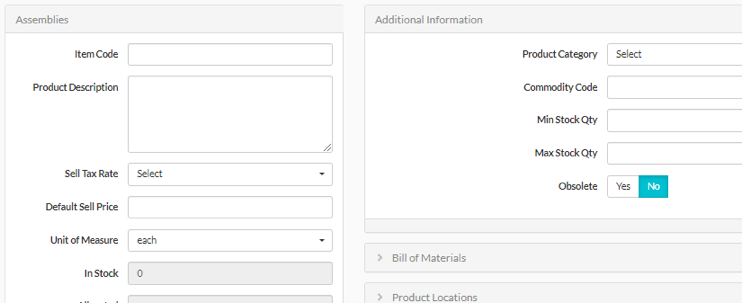
| Assemblies | ||
| Name of Field | Mandatory | Description |
| Item Code | Y | Your item code for this Assembly |
| Product Description | Y | Assembly Description |
| Sell Tax Rate | Y | Select the appropriate tax rate |
| Default Sell Price | Y | The default price for this combination of items |
| Unit of Measure | Default | Defaults to “each”. It is possible to change this |
| In Stock | Default | Stock available |
| Allocated | Default | Number allocated to orders |
| Free Stock | Default | Number available that is not already allocated to an order |
| Back Order | Default | When a Customer Order is raised and there aren’t enough assemblies in stock, the items will go on back order so they can be assembled. |
| Xero Ref | Default | Identifier of the assembly in Xero |
Enter the relevant information and save. The table below contains information of what each field represents.
The fields are very similar to the Kits area.
For information on Additional Information, Bill of Materials, Product Locations and Files, see the same sections in the Kits module above. These sections are the same in Assemblies.
Unlike with kits where a kit is assembled as and when needed, it is possible to assemble, work on and create an assembly and then hold it in stock. It is therefore possible to create a Stock Adjustment for Assemblies. Stock Adjustments in Assemblies operate in the same way as they do for ordinary products.
In order to complete production of an Assembly and bring it into stock, you will need to raise a Work Order. You can find information on how to do this on the Work Order page.
S/N Inventory
S/N (Serial Number) Inventory is a report where you can view a list of all items which have been bought and sold into stock which have serial numbers.
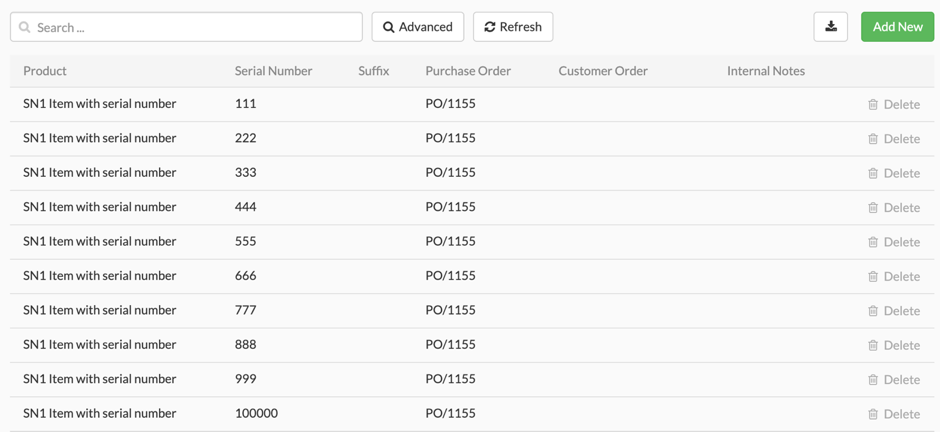
Fig 39. S/N Inventory Display
When you create a purchase order for a product with a Serial number, before you can set the Purchase Order to complete you will have to enter the serial numbers for each received item and the same will need to be done in Customer orders when they are sold. All these numbers are then visible in the S/N inventory alongside the PO number for the order they came in on and the Customer Order number for the order they were despatched on.
You cannot Add anything in this section.
Price Lists
Price lists allows you to change the price of products. You can then apply the Price List to customers and the price set in the Price List will override the price set in the Products area in the field Default Sell Price. You could use Price Lists to override the price of just one product or more commonly for a group of products. This functionality could be used to hold Sale Prices for example, or to hold separate pricing for every customer.
To create a new price list, click the Add new Button in the top right-hand corner of the screen. Once you have added your price list and saved you will be able to add products and prices to the price list by expanding the Price List Products section and clicking + New.
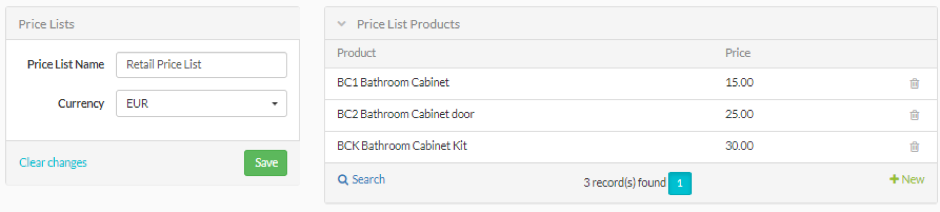
Fig 40. Price List detail
See details below of the price lists and price lists products fields:
| Price List | ||
| Name of Field | Type | Description |
| Price List Name | Alphanumeric field | The name you choose here will display in the dropdown Price List in the customer area. |
| Currency | Dropdown from your Exchange Rate field | Choose the currency for this list. |
| Add new Product | ||
| Product | Dropdown showing all Product Codes and Product descriptions | Pick the products to be included in the list. |
| Price | Numeric | The price you wish to charge in the currency you have selected for this list. |
Note: Think carefully about how you use Lists. If the default price for the products on a Price List changes, the prices on the price list won’t change and you may have to change all of the prices on your list manually. When you set percentage discounts, the price will fluctuate as the default price changes.
Use Cases
Example 1 – Retail and Wholesale
You have a group of retail customers and a group of wholesale customers. You might want to set lower prices for your wholesale customers than for retail but different products have different discounts. NB if your discount for all products is the same percentage then you might be better to set a percentage discount at customer level. See Customer Discounts in the Customer section.
You have more retail customers than wholesale so you set the default price at the price for retail customers. You then set up a list for Wholesale prices and apply that list to each Wholesale Customer.
Example 2 – Offshore buyers
You mostly sell to the UK but sometimes you sell to customers in the US. In this case you might want to set a price list in USD. But be aware, if your pricing is the same for these US customers you might want to simply use the exchange rate functionality to serve this since Price List functionality will not take account of exchange rate fluctuations in the same way.
Stock Transfer
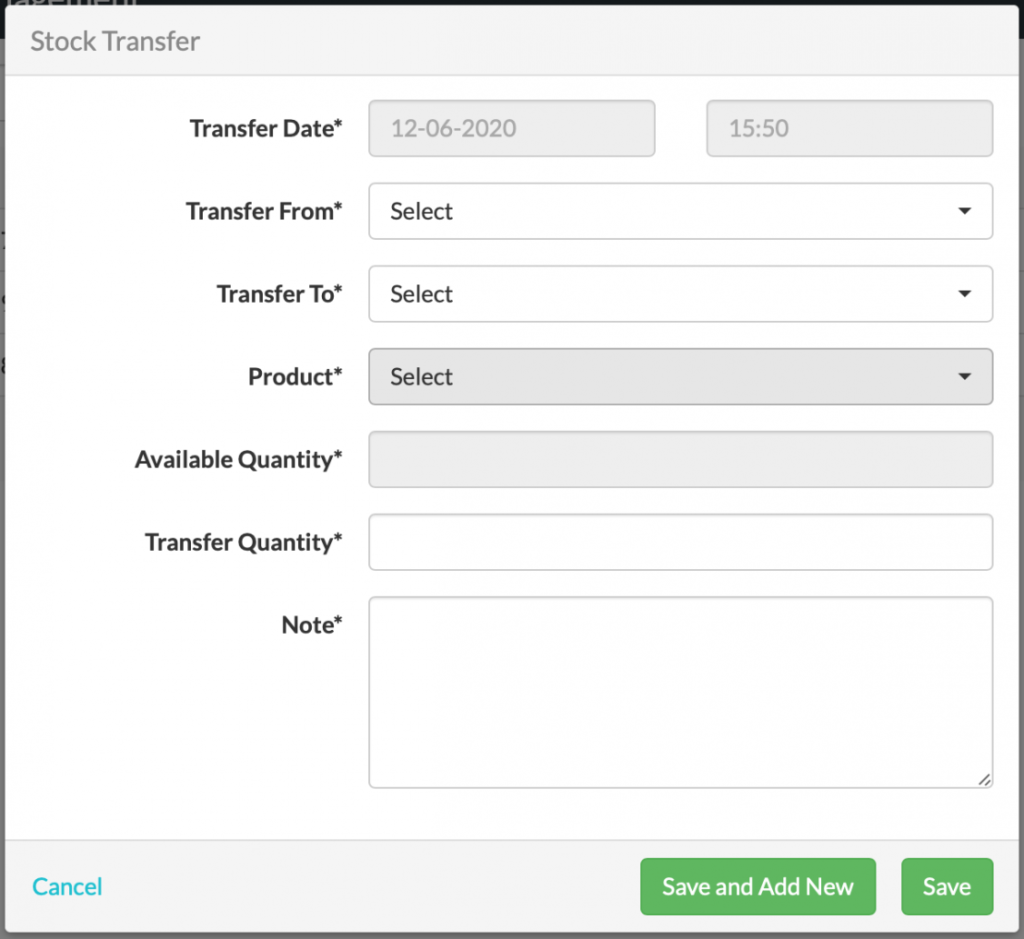
Fig 41. Stock Transfers
Fig 41. Stock Transfers
The Stock Transfer area allows you to move stock easily from one stock location to another. You are able to set up as many stock locations as you need and different Workhorse clients use this in different ways. For many one or two stock locations are sufficient but some customers have locations for each shelf in their warehouse (for example) and shift stock between them to reflect real life movements.
Simply enter the location of the items that you want to move and where you want to move them to. Select the product to move and the quantity available in that location will populate. You can then move any number of the product (up to the available quantity) and they will display in stock reports as being in the new location.